> ## Documentation Index
> Fetch the complete documentation index at: https://cometchat-22654f5b-docs-audit-content-webhooks.mintlify.site/llms.txt
> Use this file to discover all available pages before exploring further.
# CometChat Widget Builder For WordPress
> CometChat Widget Builder for WordPress is a no-code solution for embedding a fully functional chat interface with plugin configuration.
It provides a ready-to-use chat widget backed by CometChat's real-time infrastructure — install the plugin, configure your credentials, and go live.
With CometChat Widget Builder, you can:
* Embed chat and calling into any WordPress website
* Customize themes, colors, and typography
* Toggle features on and off
* Go live with a WordPress plugin and shortcode
The widget connects to CometChat's SDK and infrastructure, which manages message transport, sync, and backend scaling.
Go to the Integration Guide
**Legacy Widget (v3):** If you previously used the legacy CometChat Widget (v3) on WordPress, the legacy widget section in the Dashboard is only visible for apps that had legacy widgets configured before the migration to Widget Builder. New apps will not see the legacy widget section. For migration guidance, see the [Migration Guide](/articles/migration-guide).
***
## Widget Builder Features
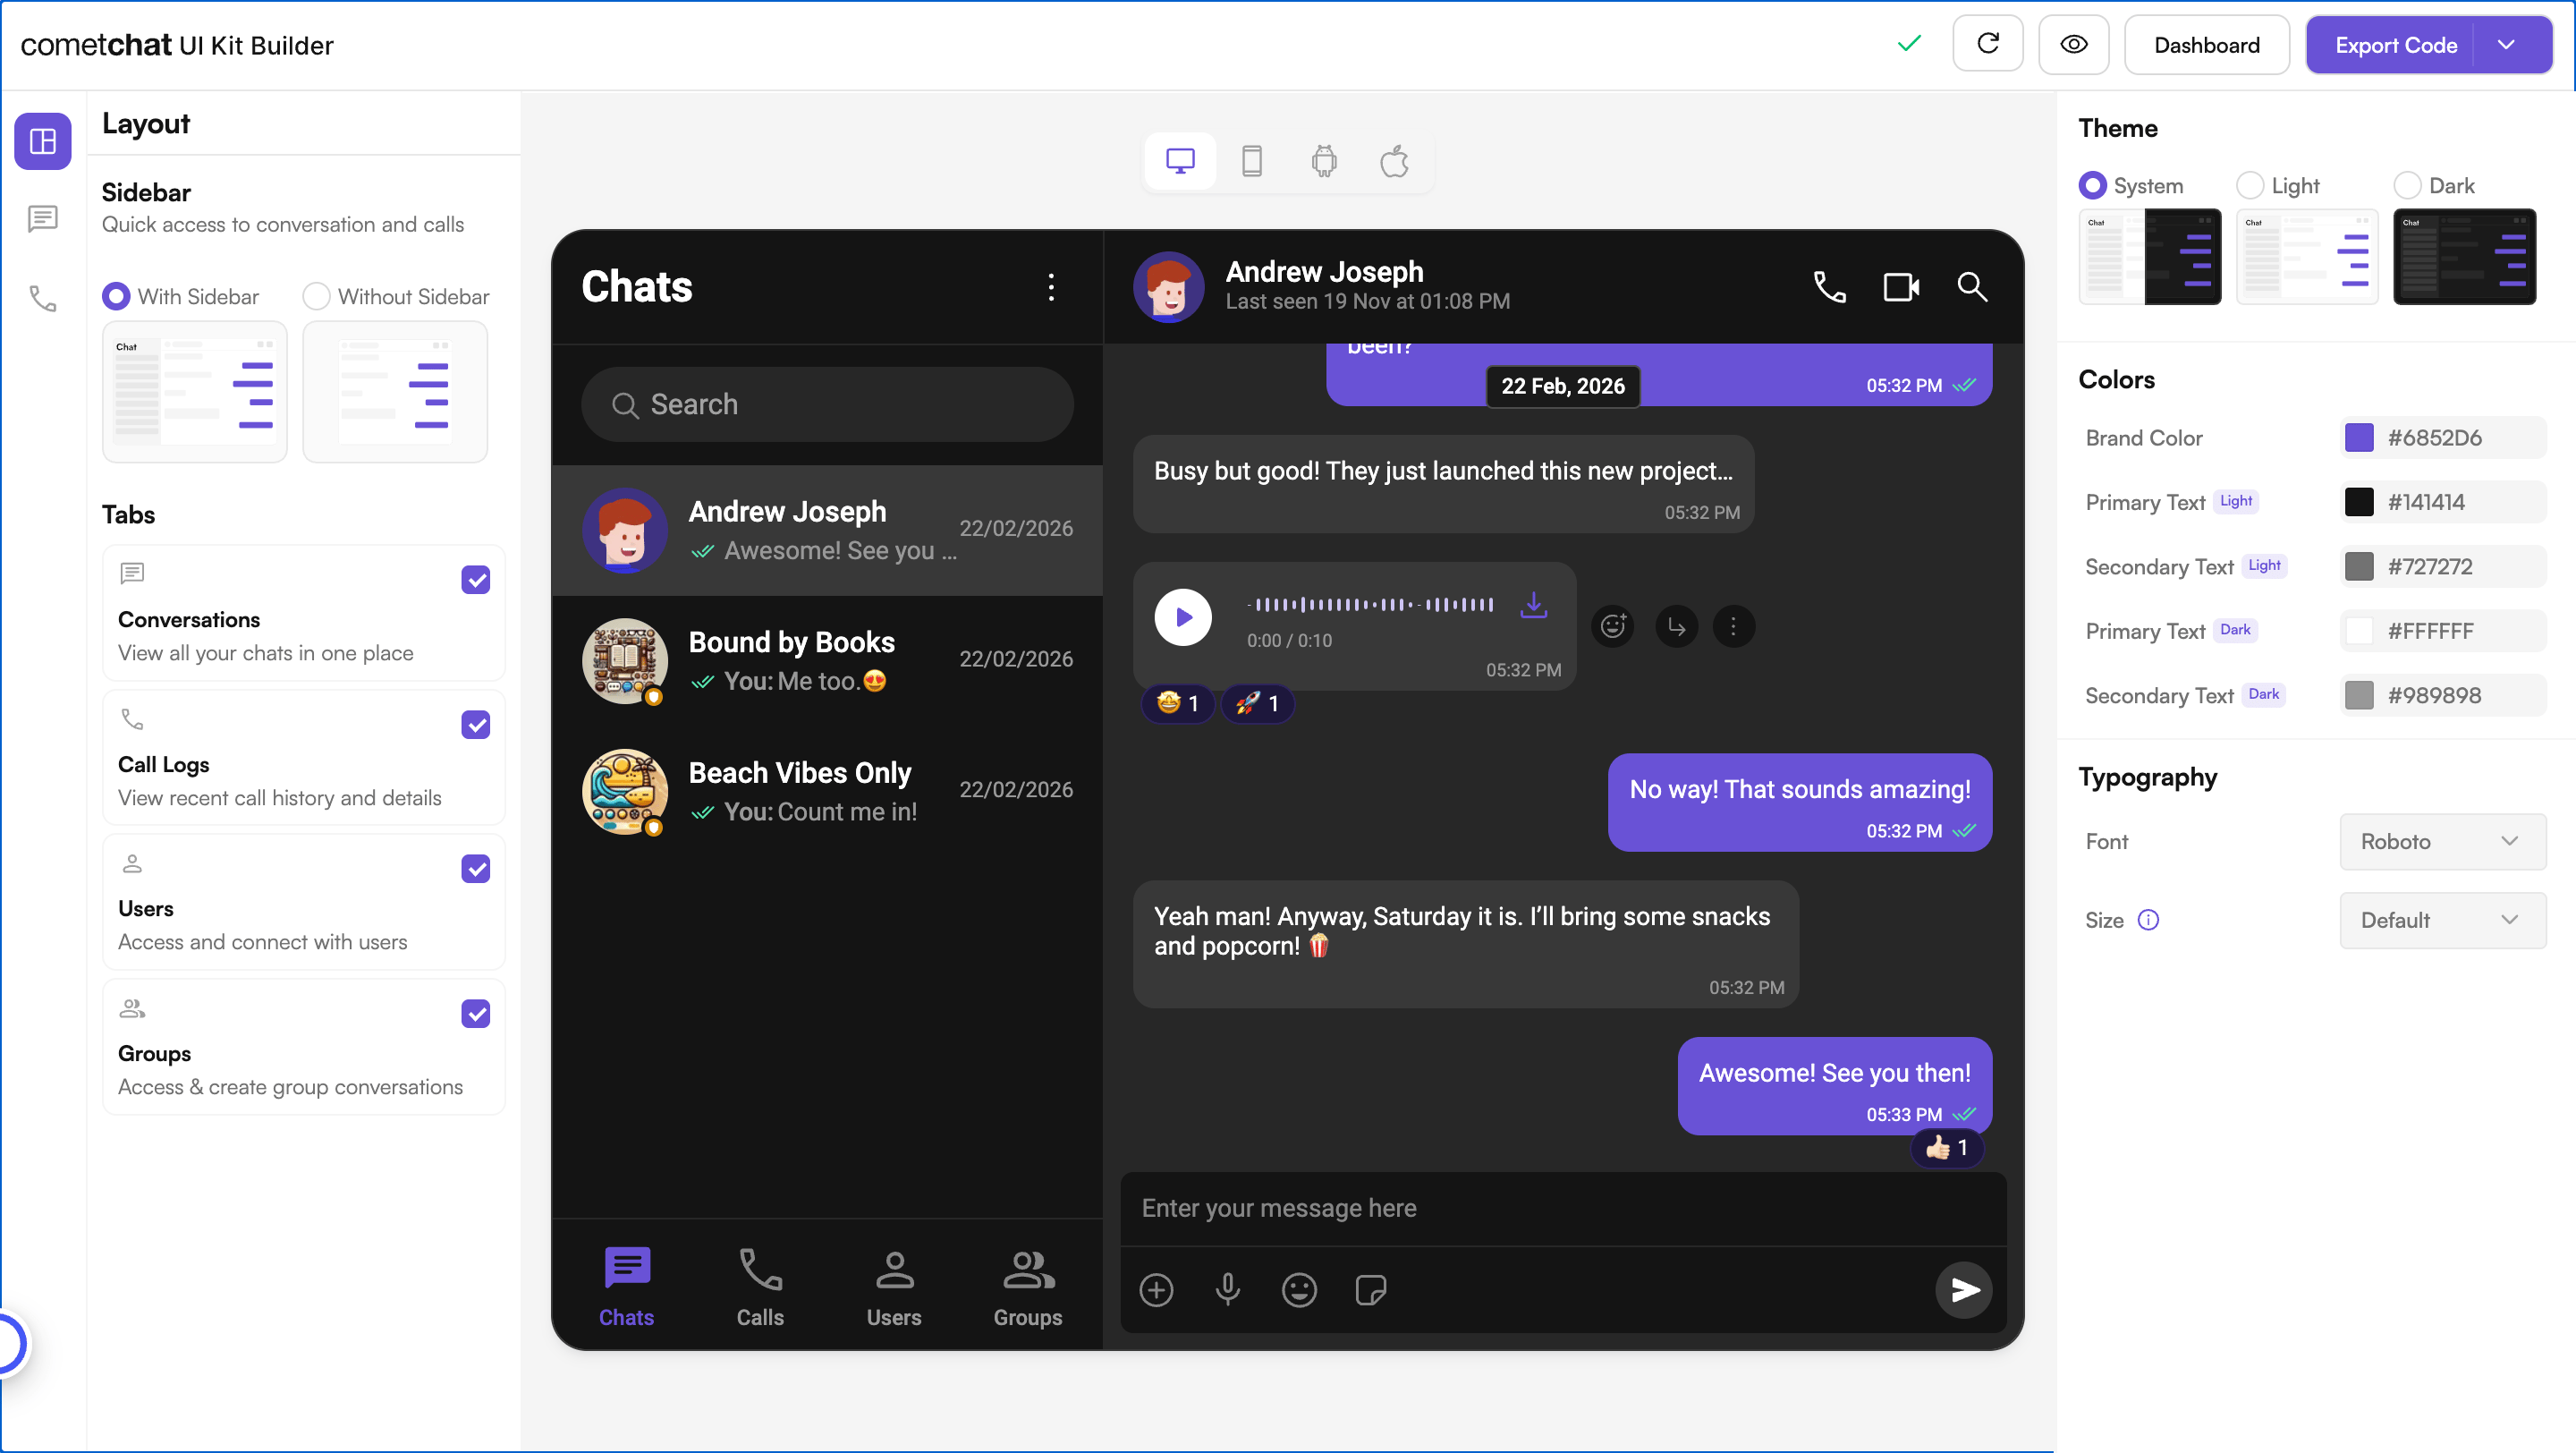
**No-Code Visual Configuration** — Widget Builder provides a visual configuration environment for designing your chat widget before embedding.
**Toggle-Based Feature Control** — Messaging and calling features can be controlled through configuration settings in the Widget Builder in dashboard.
**Ready-to-Embed Code** — After configuration, Widget Builder generates a code snippet you can use with the WordPress plugin to embed chat.
***
## How to Use Widget Builder
### 1. Design
Customize your chat widget using the visual Widget Builder:
* **Configure layout** — Toggle all the required features in the dashboard.
* **Toggle features** — Turn chat and calling features on and off from the builder interface.
* **Themes** — Select between system, light, and dark themes. Choose custom colors and typography.
### 2. Get Embed Code
Once configured, get the embed code snippet for your widget.
1. Click on **Get Embedded Code**
2. Note your app credentials (App ID, Auth Key, Region, Variant ID)
3. Copy the code snippet
#### What these credentials mean
| Credential | What it is |
| -------------- | ---------------------------------------------------------------------------------------------------------------------------------------------------------------------------------------- |
| **App ID** | The unique identifier of your CometChat app, from the [Dashboard](https://app.cometchat.com). |
| **Region** | The region your app is provisioned in (for example `us`, `eu`, `in`). |
| **Auth Key** | An app-level key used to log users in. The plugin stores it in its settings — see [Authenticating users](#authenticating-users) below for production guidance. |
| **Variant ID** | Identifies a specific saved version (snapshot) of your Widget Builder configuration, set with the `variant-id` shortcode attribute. If you omit it, the first available variant is used. |
### 3. Integrate
Install the CometChat plugin on your WordPress site and go live.
1. **Install the plugin** — Download and activate the CometChat WordPress plugin
2. **Configure credentials** — Set your App ID, Region, and Auth Key in the plugin settings
3. **Authenticate users** — Identify each visitor with a UID so they can send and receive messages (see [Authenticating users](#authenticating-users) below)
4. **Launch** — Use shortcodes or the plugin settings to display the chat widget on your site
Step-by-step instructions for embedding the Widget Builder into your WordPress website
***
## Authenticating users
Every person in CometChat is identified by a **UID** (User ID) — a unique, unchangeable string such as `user_123`, an email, or a WordPress user ID. Before the widget can send or receive messages, the visitor must be logged in. In the WordPress plugin settings you can set a **Default User UID** to auto-login a specific user; CometChat creates that user the first time it sees the UID. To give each logged-in WordPress member their own chat identity, map their WordPress account to a unique CometChat UID.
**The Auth Key logs users in directly and should not be used to authenticate real users in production.** For production, create users and generate a per-user **auth token on your server**, then log users in with that token. This is the same pattern used across CometChat's UI Kit, SDK, and Widget. See [Authentication and User Management](/fundamentals/user-auth) for the full server-side flow, and the [auth token login example](/widget/html/integration#3-backend-created-user-auth-token-login) for a worked widget snippet.
Mapping logged-in WordPress accounts to CometChat UIDs (for example, deriving the UID from the WordPress user) depends on your theme and plugin setup. The shortcode and plugin settings in the [Integration Guide](/widget/wordpress/integration) show where the UID is configured.
***
## Try Live Demo
Experience the CometChat Widget Builder in action:
***
## Need Help?
Connect with other developers and get answers
Contact our support team for assistance
***
## Related Resources
Create users and issue server-generated auth tokens
Learn more about the CometChat JavaScript SDK
Widget Builder for HTML websites
Widget Builder for Wix websites
 ### 2. Get Embed Code
Once configured, get the embed code snippet for your widget.
1. Click on **Get Embedded Code**
2. Note your app credentials (App ID, Auth Key, Region, Variant ID)
3. Copy the code snippet
#### What these credentials mean
| Credential | What it is |
| -------------- | ---------------------------------------------------------------------------------------------------------------------------------------------------------------------------------------- |
| **App ID** | The unique identifier of your CometChat app, from the [Dashboard](https://app.cometchat.com). |
| **Region** | The region your app is provisioned in (for example `us`, `eu`, `in`). |
| **Auth Key** | An app-level key used to log users in. The plugin stores it in its settings — see [Authenticating users](#authenticating-users) below for production guidance. |
| **Variant ID** | Identifies a specific saved version (snapshot) of your Widget Builder configuration, set with the `variant-id` shortcode attribute. If you omit it, the first available variant is used. |
### 3. Integrate
Install the CometChat plugin on your WordPress site and go live.
1. **Install the plugin** — Download and activate the CometChat WordPress plugin
2. **Configure credentials** — Set your App ID, Region, and Auth Key in the plugin settings
3. **Authenticate users** — Identify each visitor with a UID so they can send and receive messages (see [Authenticating users](#authenticating-users) below)
4. **Launch** — Use shortcodes or the plugin settings to display the chat widget on your site
### 2. Get Embed Code
Once configured, get the embed code snippet for your widget.
1. Click on **Get Embedded Code**
2. Note your app credentials (App ID, Auth Key, Region, Variant ID)
3. Copy the code snippet
#### What these credentials mean
| Credential | What it is |
| -------------- | ---------------------------------------------------------------------------------------------------------------------------------------------------------------------------------------- |
| **App ID** | The unique identifier of your CometChat app, from the [Dashboard](https://app.cometchat.com). |
| **Region** | The region your app is provisioned in (for example `us`, `eu`, `in`). |
| **Auth Key** | An app-level key used to log users in. The plugin stores it in its settings — see [Authenticating users](#authenticating-users) below for production guidance. |
| **Variant ID** | Identifies a specific saved version (snapshot) of your Widget Builder configuration, set with the `variant-id` shortcode attribute. If you omit it, the first available variant is used. |
### 3. Integrate
Install the CometChat plugin on your WordPress site and go live.
1. **Install the plugin** — Download and activate the CometChat WordPress plugin
2. **Configure credentials** — Set your App ID, Region, and Auth Key in the plugin settings
3. **Authenticate users** — Identify each visitor with a UID so they can send and receive messages (see [Authenticating users](#authenticating-users) below)
4. **Launch** — Use shortcodes or the plugin settings to display the chat widget on your site