> ## Documentation Index
> Fetch the complete documentation index at: https://cometchat-22654f5b-docs-audit-content-webhooks.mintlify.site/llms.txt
> Use this file to discover all available pages before exploring further.
# CometChat Widget Builder For Squarespace
> CometChat Widget Builder for Squarespace is a no-code solution for embedding a fully functional chat interface with a simple code snippet.
It provides a ready-to-use chat widget backed by CometChat's real-time infrastructure — add the embed code via Code Injection and go live.
With CometChat Widget Builder, you can:
* Embed chat and calling into any Squarespace website
* Customize themes, colors, and typography
* Toggle features on and off
* Go live with a simple embed code snippet
The widget connects to CometChat's SDK and infrastructure, which manages message transport, sync, and backend scaling.
Go to the Integration Guide
***
## Widget Builder Features
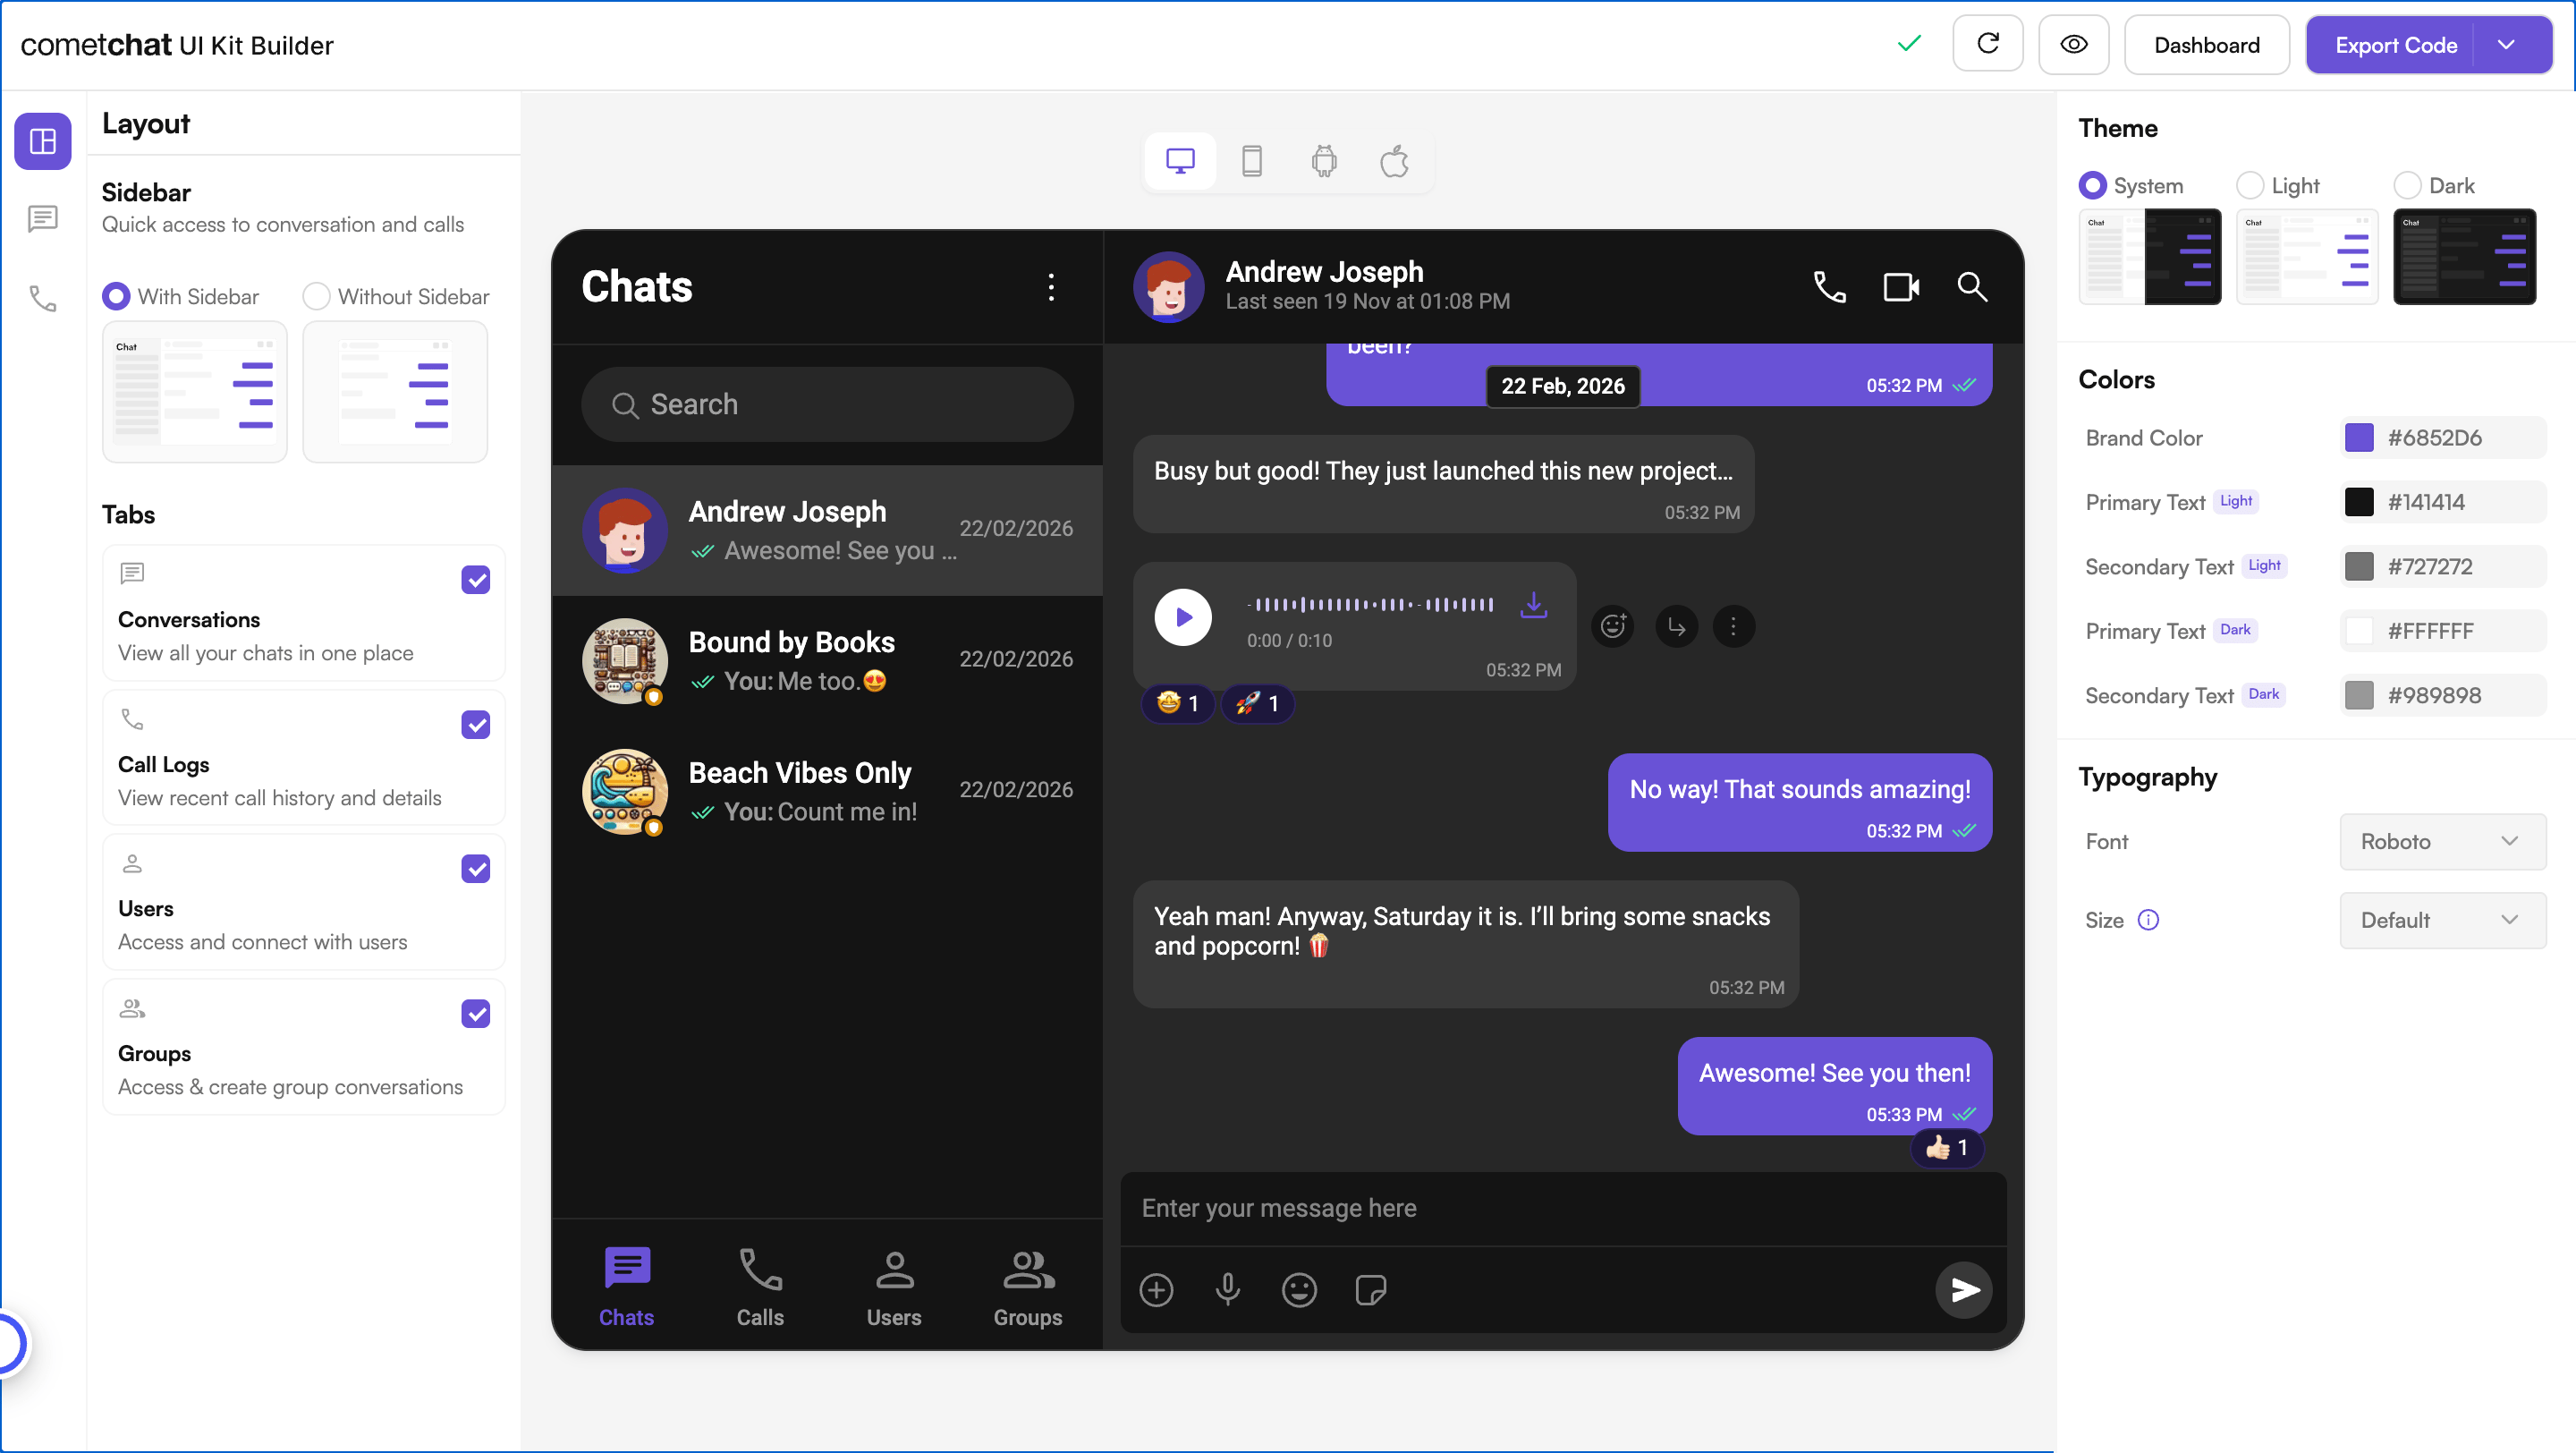
**No-Code Visual Configuration** — Widget Builder provides a visual configuration environment for designing your chat widget before embedding.
**Toggle-Based Feature Control** — Messaging and calling features can be controlled through configuration settings in the Widget Builder in dashboard.
**Ready-to-Embed Code** — After configuration, Widget Builder generates a code snippet you can add to your Squarespace site via Code Injection.
***
## How to Use Widget Builder
### 1. Design
Customize your chat widget using the visual Widget Builder:
* **Configure layout** — Toggle all the required features in the dashboard.
* **Toggle features** — Turn chat and calling features on and off from the builder interface.
* **Themes** — Select between system, light, and dark themes. Choose custom colors and typography.
### 2. Get Embed Code
Once configured, get the embed code snippet for your widget.
1. Click on **Get Embedded Code**
2. Note your app credentials (App ID, Auth Key, Region, Variant ID)
3. Copy the code snippet
#### What these credentials mean
| Credential | What it is |
| -------------- | ----------------------------------------------------------------------------------------------------------------------------------------------------------------------------------------------------------- |
| **App ID** | The unique identifier of your CometChat app, from the [Dashboard](https://app.cometchat.com). |
| **Region** | The region your app is provisioned in (for example `us`, `eu`, `in`). |
| **Auth Key** | An app-level key used to log users in directly from the page. Convenient for development, but it is visible to anyone who views your page source — see [Authenticating users](#authenticating-users) below. |
| **Variant ID** | Identifies a specific saved version (snapshot) of your Widget Builder configuration. If you omit it, the first available variant is used. |
### 3. Integrate
Add the embed code to your Squarespace website and go live.
1. **Open Code Injection** — Go to Settings → Advanced → Code Injection in your Squarespace dashboard
2. **Paste the code snippet** into the Footer section of Code Injection
3. **Configure credentials** — Set your App ID, Region, and Auth Key in the snippet
4. **Authenticate users** — Choose a sign-in mode so CometChat knows who each visitor is (see [Authenticating users](#authenticating-users) below)
5. **Launch** — Save and the chat widget is live on your Squarespace site
Step-by-step instructions for embedding the Widget Builder into your Squarespace website
***
## Authenticating users
Every person in CometChat is identified by a **UID** (User ID) — a unique, unchangeable string such as `user_123`, an email, or a member ID from your site. Before the widget can send or receive messages, it must log a user in. The embed snippet supports three sign-in modes, selected with the `mode` field in the widget config:
`mode: "guest"` lets anyone chat without an account. CometChat assigns a temporary identity. Best for marketing pages, help centers, and demos.
`mode: "uid"` logs people in with an ID you already have (member ID, email, etc.). CometChat creates the user the first time it sees that UID. No backend required.
`mode: "authToken"` logs people in with a short-lived token your **server** generates. This keeps your Auth Key off the page and is the recommended choice for production.
**Do not ship your Auth Key in production.** In guest and UID modes the Auth Key is embedded in the page and is visible to anyone who views the source. For production, generate a per-user **auth token on your server** and log in with `mode: "authToken"` instead. See [Authentication and User Management](/fundamentals/user-auth) for the server-side flow.
The full Squarespace [Integration Guide](/widget/squarespace/integration) includes copy-paste snippets for all three modes, including a Squarespace Members auto-login example and the [auth token login flow](/widget/squarespace/integration#3-backend-created-user-auth-token-login).
Squarespace's member-identity APIs are owned by Squarespace and are outside CometChat's control. To map logged-in Squarespace members to CometChat UIDs, consult [Squarespace's own developer documentation](https://developers.squarespace.com/) for the member object available on your plan, then pass that ID as the `uid` (UID mode) or use it server-side to mint an auth token.
***
## Try Live Demo
Experience the CometChat Widget Builder in action:
***
## Need Help?
Connect with other developers and get answers
Contact our support team for assistance
***
## Related Resources
Create users and issue server-generated auth tokens
Learn more about the CometChat JavaScript SDK
Widget Builder for HTML websites
Widget Builder for Webflow websites
 ### 2. Get Embed Code
Once configured, get the embed code snippet for your widget.
1. Click on **Get Embedded Code**
2. Note your app credentials (App ID, Auth Key, Region, Variant ID)
3. Copy the code snippet
#### What these credentials mean
| Credential | What it is |
| -------------- | ----------------------------------------------------------------------------------------------------------------------------------------------------------------------------------------------------------- |
| **App ID** | The unique identifier of your CometChat app, from the [Dashboard](https://app.cometchat.com). |
| **Region** | The region your app is provisioned in (for example `us`, `eu`, `in`). |
| **Auth Key** | An app-level key used to log users in directly from the page. Convenient for development, but it is visible to anyone who views your page source — see [Authenticating users](#authenticating-users) below. |
| **Variant ID** | Identifies a specific saved version (snapshot) of your Widget Builder configuration. If you omit it, the first available variant is used. |
### 3. Integrate
Add the embed code to your Squarespace website and go live.
1. **Open Code Injection** — Go to Settings → Advanced → Code Injection in your Squarespace dashboard
2. **Paste the code snippet** into the Footer section of Code Injection
3. **Configure credentials** — Set your App ID, Region, and Auth Key in the snippet
4. **Authenticate users** — Choose a sign-in mode so CometChat knows who each visitor is (see [Authenticating users](#authenticating-users) below)
5. **Launch** — Save and the chat widget is live on your Squarespace site
### 2. Get Embed Code
Once configured, get the embed code snippet for your widget.
1. Click on **Get Embedded Code**
2. Note your app credentials (App ID, Auth Key, Region, Variant ID)
3. Copy the code snippet
#### What these credentials mean
| Credential | What it is |
| -------------- | ----------------------------------------------------------------------------------------------------------------------------------------------------------------------------------------------------------- |
| **App ID** | The unique identifier of your CometChat app, from the [Dashboard](https://app.cometchat.com). |
| **Region** | The region your app is provisioned in (for example `us`, `eu`, `in`). |
| **Auth Key** | An app-level key used to log users in directly from the page. Convenient for development, but it is visible to anyone who views your page source — see [Authenticating users](#authenticating-users) below. |
| **Variant ID** | Identifies a specific saved version (snapshot) of your Widget Builder configuration. If you omit it, the first available variant is used. |
### 3. Integrate
Add the embed code to your Squarespace website and go live.
1. **Open Code Injection** — Go to Settings → Advanced → Code Injection in your Squarespace dashboard
2. **Paste the code snippet** into the Footer section of Code Injection
3. **Configure credentials** — Set your App ID, Region, and Auth Key in the snippet
4. **Authenticate users** — Choose a sign-in mode so CometChat knows who each visitor is (see [Authenticating users](#authenticating-users) below)
5. **Launch** — Save and the chat widget is live on your Squarespace site