> ## Documentation Index
> Fetch the complete documentation index at: https://cometchat-22654f5b-docs-audit-content-webhooks.mintlify.site/llms.txt
> Use this file to discover all available pages before exploring further.
# UI Kit Builder Integration
> Step-by-step guide to integrating CometChat's UI Kit Builder into your iOS application using UI Kit Builder configuration.
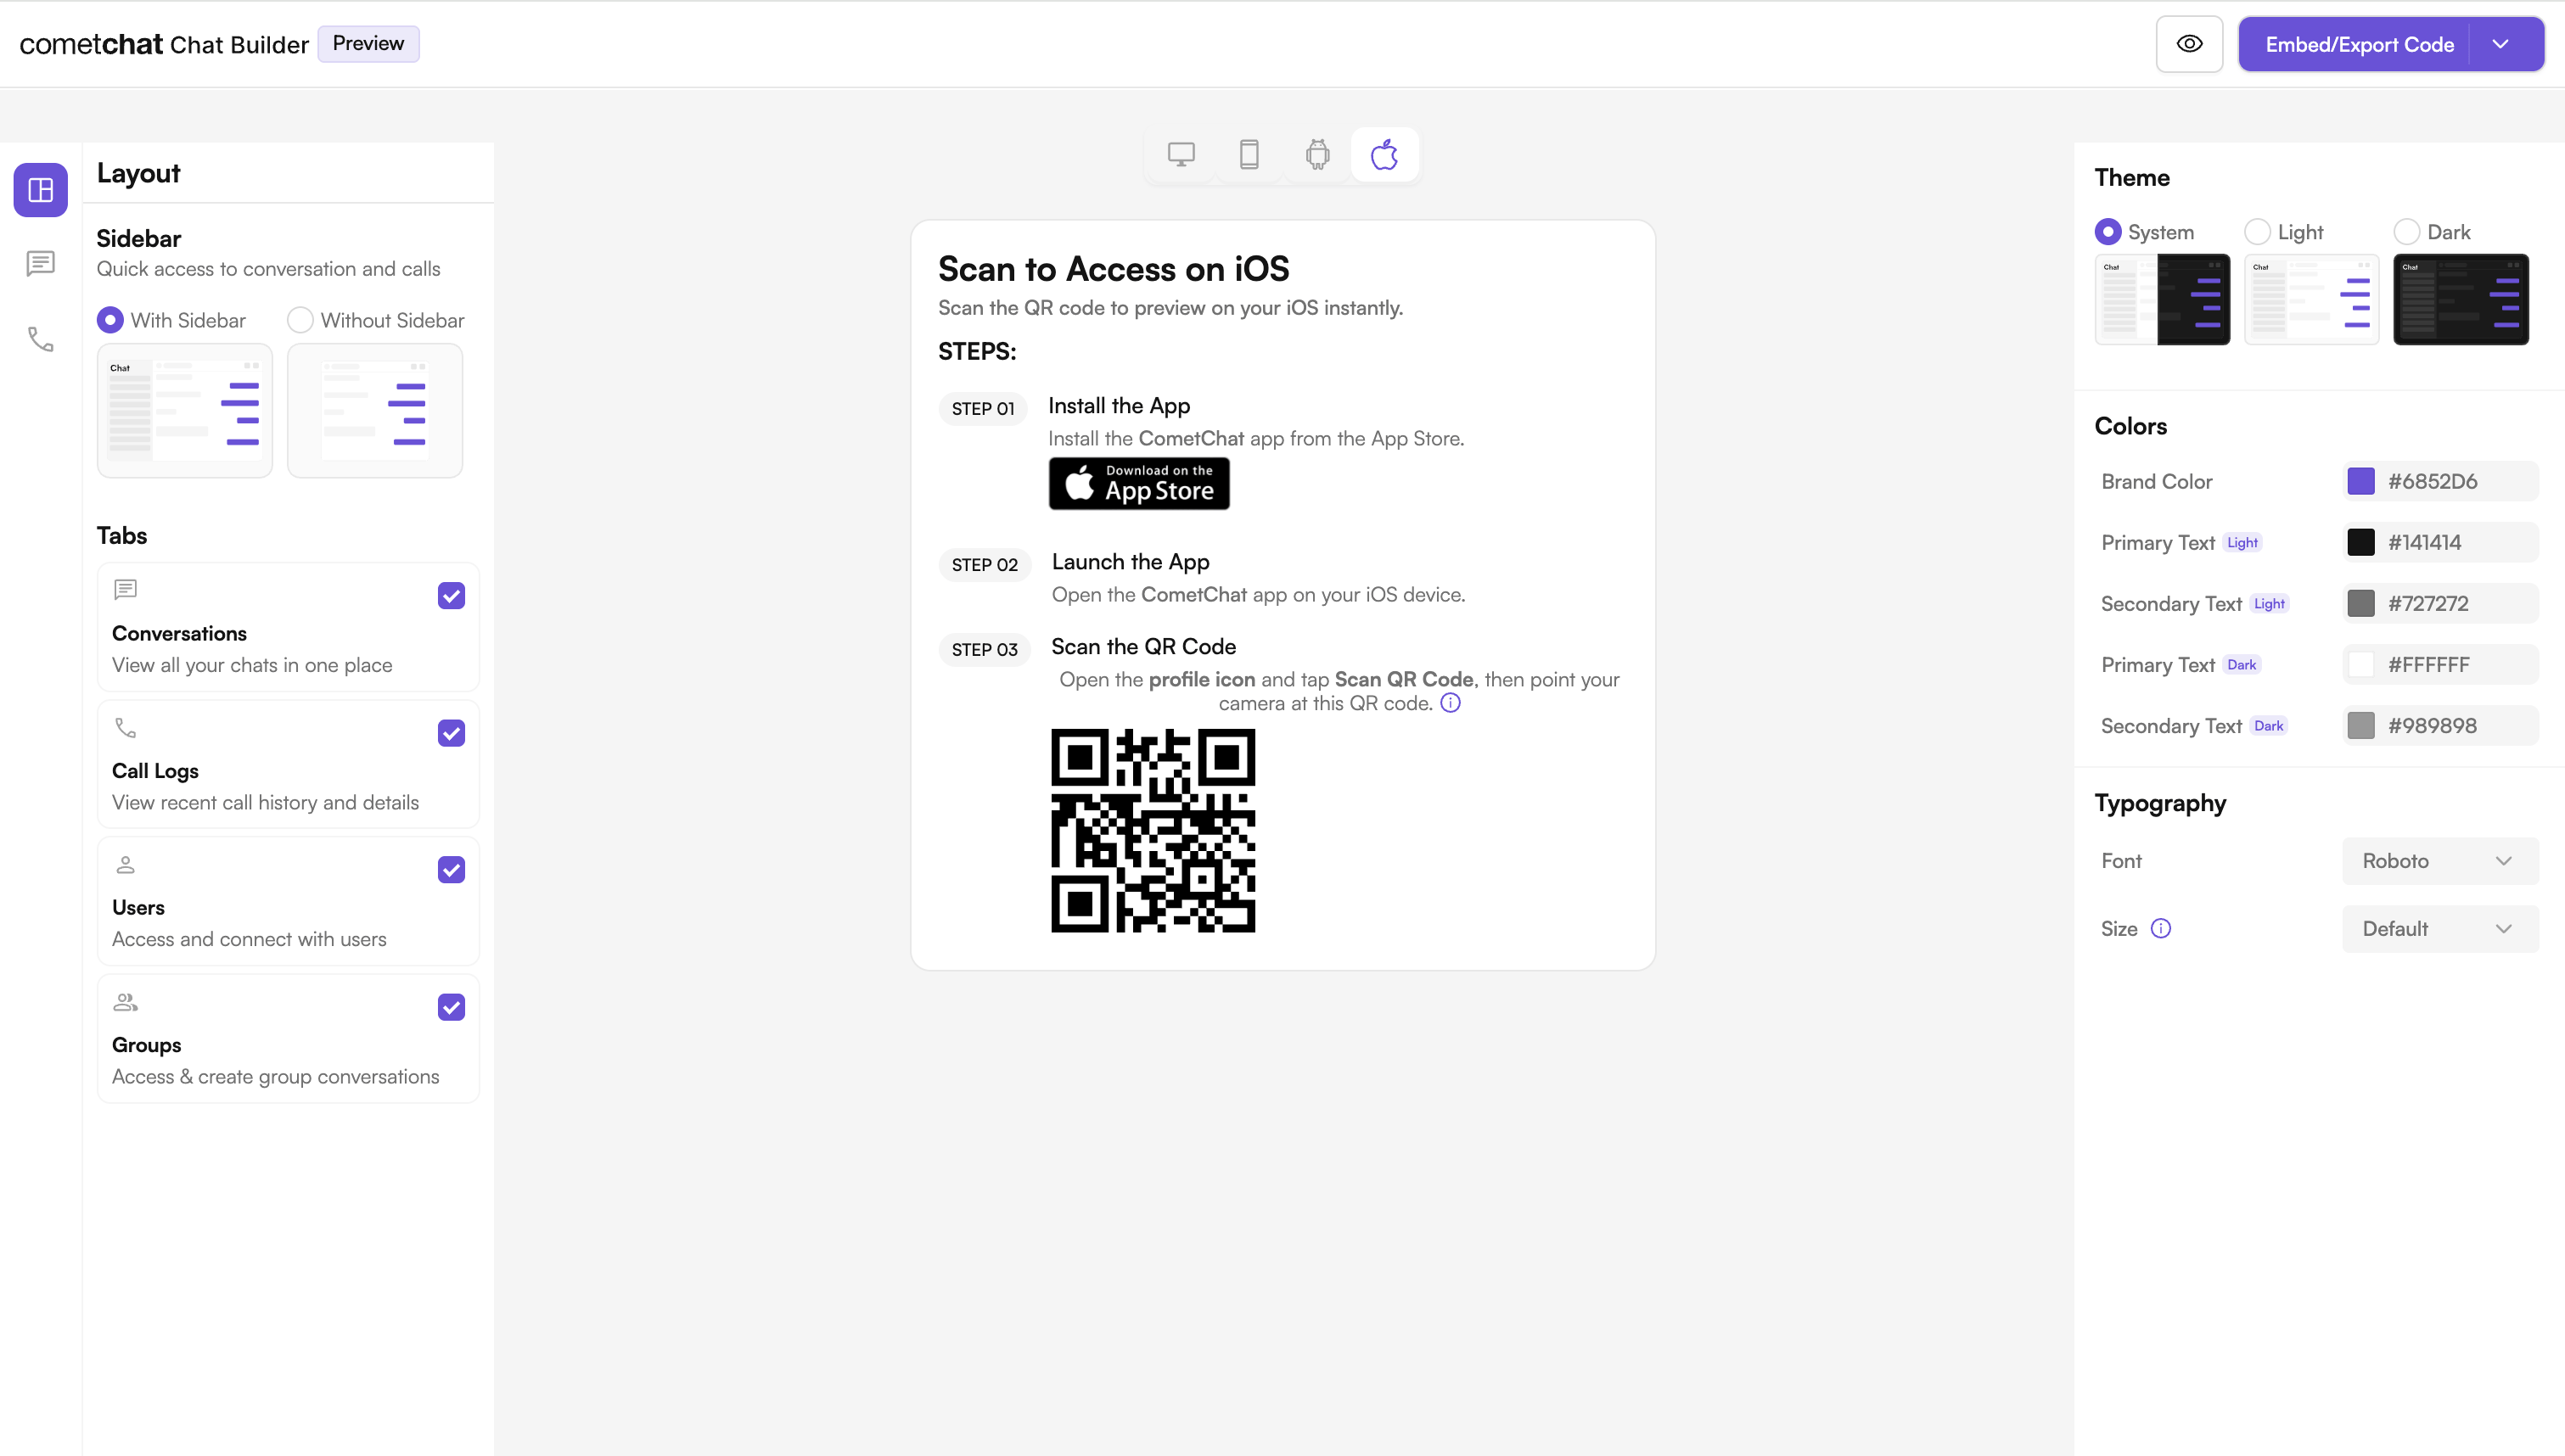
This guide demonstrates how to integrate the **CometChat UI Kit Builder** configuration system into your iOS application. The configuration can be loaded into your app using a local JSON file.
 ***
## Prerequisites
Before running this project on iOS, make sure you have:
* **Xcode** (latest version recommended)
* **macOS device** with macOS 12.0 or above
* **iOS Device or Simulator** with iOS 13.0 or above
* **CocoaPods** (latest version installed) — required for the exported sample project; Swift Package Manager is also supported when integrating into your own app
* **Internet connection** (required for CometChat services)
* Your **App ID**, **Auth Key**, and **Region** from the [CometChat Dashboard](https://app.cometchat.com) → Your App → Credentials
***
## Complete Integration Workflow
1. **Download the Project** - Download the project zip from the CometChat Dashboard and extract it.
2. **Install Dependencies** - Install CocoaPods dependencies.
3. **Configure Settings** - Load UI Kit Builder settings from JSON file.
4. **Build & Run** - Build and run the project in Xcode.
***
## Launch the UI Kit Builder
1. Log in to your [CometChat Dashboard](https://app.cometchat.com).
2. Select your application from the list.
3. Navigate to **Chat & Messaging** → **Get Started**.
4. Navigate to **Integrate** → **iOS** → **Launch UI Kit Builder**.
In the Builder, customize features, layout, and theme, then download the generated project zip. The zip includes your `cometchat-builder-settings.json` file, which captures every toggle and style you selected.
The `cometchat-builder-settings.json` file is exported from the UI Kit Builder along with the rest of the project. It is the single source of truth for your feature toggles, layout, and styling. For the full list of keys it contains, see [UI Kit Builder Settings](/chat-builder/ios/builder-settings).
***
## Integration Options
Choose one of the following integration methods based on your needs:
| Option | Best For | Complexity |
| ---------------------------------------- | -------------------------------------------------------------- | ---------- |
| **Run Sample App** | Quick preview and testing of Builder configurations | Easy |
| **Integrate Config Store** (Recommended) | Production apps where you want full control over customization | Medium |
***
## Option 1: Run the Sample App
### Setup
### Step 1: Download and Extract Project
Download the project zip from the CometChat Dashboard and extract it.
### Step 2: Navigate to Project Folder
```bash theme={null}
cd
```
### Step 3: Open Xcode Project
Open the `.xcodeproj` file once to let Xcode configure the project.
### Step 4: Install Dependencies
Install dependencies using CocoaPods:
```bash theme={null}
pod install
```
### Step 5: Open Workspace
Open the `.xcworkspace` file instead of `.xcodeproj` from now on:
```bash theme={null}
open .xcworkspace
```
### Step 6: Build & Run
Build and run the project in Xcode.
***
## Option 2: Integrate Builder Configuration into Your iOS App
This method gives you full control over customization and is recommended for production apps. You take the exported `cometchat-builder-settings.json` file and the CometChat UI Kit, then wire them together inside your own app.
### Install the CometChat UI Kit
The Builder configuration is applied on top of the standard CometChat iOS UI Kit. Install the UI Kit using either CocoaPods or Swift Package Manager.
Add CometChat to your `Podfile`:
```ruby title="Podfile" theme={null}
platform :ios, '13.0'
use_frameworks!
target 'YourApp' do
pod 'CometChatUIKitSwift'
# Optional: Voice/Video Calling
pod 'CometChatCallsSDK'
end
```
Then run:
```bash theme={null}
pod install --repo-update
```
Open the `.xcworkspace` file (not `.xcodeproj`) from now on.
1. In Xcode, go to **File → Add Package Dependencies**.
2. Enter the official UI Kit repository URL:
```
https://github.com/cometchat/cometchat-uikit-ios
```
3. Select the package and add it to your app target.
For pinned versions, requirements, and the full UI Kit install reference, see the [iOS UI Kit Getting Started guide](/ui-kit/ios/getting-started). The exported Builder project ships with a `Podfile` already configured, so for that project you only need to run `pod install`.
***
## Configure Your CometChat Credentials
The exported project keeps your CometChat credentials in `AppConstants.swift` (App ID, Auth Key, and Region). Set these before the app initializes CometChat.
```swift title="AppConstants.swift" theme={null}
struct AppConstants {
static let APP_ID = "YOUR_APP_ID"
static let AUTH_KEY = "YOUR_AUTH_KEY"
static let REGION = "YOUR_REGION"
}
```
The **Auth Key** is intended for development and proof-of-concept work only. Do not ship Auth Keys in production builds — anyone who extracts your app binary can read them. For production, generate short-lived **Auth Tokens** server-side via the [REST API](/rest-api/chat-apis) and authenticate with [`loginWithAuthToken()`](/ui-kit/ios/methods#login-using-auth-token). Keep credentials out of source control (for example, inject them via an `.xcconfig` file or your CI secrets store).
***
## Load Settings from JSON
Use this method if you are shipping a `.json` configuration file with your app.
### Step 1: Add Your JSON File
Place your `cometchat-builder-settings.json` inside your app target and make sure:
* It's added to your target membership.
### Step 2: Load Settings at Launch
```swift theme={null}
import CometChatBuilder
func application(_ application: UIApplication,
didFinishLaunchingWithOptions launchOptions: [UIApplication.LaunchOptionsKey: Any]?) -> Bool {
// This automatically loads JSON config
CometChatBuilderSettings.loadFromJSON()
CometChatTheme.primaryColor = UIColor.dynamicColor(
lightModeColor: UIColor(hex: CometChatBuilderSettings.shared.style.color.brandColor),
darkModeColor: UIColor(hex: CometChatBuilderSettings.shared.style.color.brandColor)
)
CometChatTheme.textColorPrimary = UIColor.dynamicColor(
lightModeColor: UIColor(hex: CometChatBuilderSettings.shared.style.color.primaryTextLight),
darkModeColor: UIColor(hex: CometChatBuilderSettings.shared.style.color.primaryTextDark)
)
CometChatTheme.textColorSecondary = UIColor.dynamicColor(
lightModeColor: UIColor(hex: CometChatBuilderSettings.shared.style.color.secondaryTextLight),
darkModeColor: UIColor(hex: CometChatBuilderSettings.shared.style.color.secondaryTextDark)
)
CometChatTypography.customFontFamilyName = CometChatBuilderSettings.shared.style.typography.font
return true
}
```
***
## Important Guidelines for Changes
**Functional Changes:**
For enabling or disabling features and adjusting configurations, update the `cometchat-builder-settings.json` file. This controls all feature flags and configuration constants.
**UI and Theme-related Changes:**
For any updates related to UI, such as colors, fonts, and styles, modify the `CometChatTheme` and `CometChatTypography` properties in your AppDelegate.
***
## Enable Features in CometChat Dashboard
If your app needs any of these features, enable them from your [Dashboard](https://app.cometchat.com):
* Stickers
* Polls
* Collaborative whiteboard
* Collaborative document
* Message translation
* AI User Copilot: Conversation starter, Conversation summary, Smart reply
**How to enable:**
***
## Prerequisites
Before running this project on iOS, make sure you have:
* **Xcode** (latest version recommended)
* **macOS device** with macOS 12.0 or above
* **iOS Device or Simulator** with iOS 13.0 or above
* **CocoaPods** (latest version installed) — required for the exported sample project; Swift Package Manager is also supported when integrating into your own app
* **Internet connection** (required for CometChat services)
* Your **App ID**, **Auth Key**, and **Region** from the [CometChat Dashboard](https://app.cometchat.com) → Your App → Credentials
***
## Complete Integration Workflow
1. **Download the Project** - Download the project zip from the CometChat Dashboard and extract it.
2. **Install Dependencies** - Install CocoaPods dependencies.
3. **Configure Settings** - Load UI Kit Builder settings from JSON file.
4. **Build & Run** - Build and run the project in Xcode.
***
## Launch the UI Kit Builder
1. Log in to your [CometChat Dashboard](https://app.cometchat.com).
2. Select your application from the list.
3. Navigate to **Chat & Messaging** → **Get Started**.
4. Navigate to **Integrate** → **iOS** → **Launch UI Kit Builder**.
In the Builder, customize features, layout, and theme, then download the generated project zip. The zip includes your `cometchat-builder-settings.json` file, which captures every toggle and style you selected.
The `cometchat-builder-settings.json` file is exported from the UI Kit Builder along with the rest of the project. It is the single source of truth for your feature toggles, layout, and styling. For the full list of keys it contains, see [UI Kit Builder Settings](/chat-builder/ios/builder-settings).
***
## Integration Options
Choose one of the following integration methods based on your needs:
| Option | Best For | Complexity |
| ---------------------------------------- | -------------------------------------------------------------- | ---------- |
| **Run Sample App** | Quick preview and testing of Builder configurations | Easy |
| **Integrate Config Store** (Recommended) | Production apps where you want full control over customization | Medium |
***
## Option 1: Run the Sample App
### Setup
### Step 1: Download and Extract Project
Download the project zip from the CometChat Dashboard and extract it.
### Step 2: Navigate to Project Folder
```bash theme={null}
cd
```
### Step 3: Open Xcode Project
Open the `.xcodeproj` file once to let Xcode configure the project.
### Step 4: Install Dependencies
Install dependencies using CocoaPods:
```bash theme={null}
pod install
```
### Step 5: Open Workspace
Open the `.xcworkspace` file instead of `.xcodeproj` from now on:
```bash theme={null}
open .xcworkspace
```
### Step 6: Build & Run
Build and run the project in Xcode.
***
## Option 2: Integrate Builder Configuration into Your iOS App
This method gives you full control over customization and is recommended for production apps. You take the exported `cometchat-builder-settings.json` file and the CometChat UI Kit, then wire them together inside your own app.
### Install the CometChat UI Kit
The Builder configuration is applied on top of the standard CometChat iOS UI Kit. Install the UI Kit using either CocoaPods or Swift Package Manager.
Add CometChat to your `Podfile`:
```ruby title="Podfile" theme={null}
platform :ios, '13.0'
use_frameworks!
target 'YourApp' do
pod 'CometChatUIKitSwift'
# Optional: Voice/Video Calling
pod 'CometChatCallsSDK'
end
```
Then run:
```bash theme={null}
pod install --repo-update
```
Open the `.xcworkspace` file (not `.xcodeproj`) from now on.
1. In Xcode, go to **File → Add Package Dependencies**.
2. Enter the official UI Kit repository URL:
```
https://github.com/cometchat/cometchat-uikit-ios
```
3. Select the package and add it to your app target.
For pinned versions, requirements, and the full UI Kit install reference, see the [iOS UI Kit Getting Started guide](/ui-kit/ios/getting-started). The exported Builder project ships with a `Podfile` already configured, so for that project you only need to run `pod install`.
***
## Configure Your CometChat Credentials
The exported project keeps your CometChat credentials in `AppConstants.swift` (App ID, Auth Key, and Region). Set these before the app initializes CometChat.
```swift title="AppConstants.swift" theme={null}
struct AppConstants {
static let APP_ID = "YOUR_APP_ID"
static let AUTH_KEY = "YOUR_AUTH_KEY"
static let REGION = "YOUR_REGION"
}
```
The **Auth Key** is intended for development and proof-of-concept work only. Do not ship Auth Keys in production builds — anyone who extracts your app binary can read them. For production, generate short-lived **Auth Tokens** server-side via the [REST API](/rest-api/chat-apis) and authenticate with [`loginWithAuthToken()`](/ui-kit/ios/methods#login-using-auth-token). Keep credentials out of source control (for example, inject them via an `.xcconfig` file or your CI secrets store).
***
## Load Settings from JSON
Use this method if you are shipping a `.json` configuration file with your app.
### Step 1: Add Your JSON File
Place your `cometchat-builder-settings.json` inside your app target and make sure:
* It's added to your target membership.
### Step 2: Load Settings at Launch
```swift theme={null}
import CometChatBuilder
func application(_ application: UIApplication,
didFinishLaunchingWithOptions launchOptions: [UIApplication.LaunchOptionsKey: Any]?) -> Bool {
// This automatically loads JSON config
CometChatBuilderSettings.loadFromJSON()
CometChatTheme.primaryColor = UIColor.dynamicColor(
lightModeColor: UIColor(hex: CometChatBuilderSettings.shared.style.color.brandColor),
darkModeColor: UIColor(hex: CometChatBuilderSettings.shared.style.color.brandColor)
)
CometChatTheme.textColorPrimary = UIColor.dynamicColor(
lightModeColor: UIColor(hex: CometChatBuilderSettings.shared.style.color.primaryTextLight),
darkModeColor: UIColor(hex: CometChatBuilderSettings.shared.style.color.primaryTextDark)
)
CometChatTheme.textColorSecondary = UIColor.dynamicColor(
lightModeColor: UIColor(hex: CometChatBuilderSettings.shared.style.color.secondaryTextLight),
darkModeColor: UIColor(hex: CometChatBuilderSettings.shared.style.color.secondaryTextDark)
)
CometChatTypography.customFontFamilyName = CometChatBuilderSettings.shared.style.typography.font
return true
}
```
***
## Important Guidelines for Changes
**Functional Changes:**
For enabling or disabling features and adjusting configurations, update the `cometchat-builder-settings.json` file. This controls all feature flags and configuration constants.
**UI and Theme-related Changes:**
For any updates related to UI, such as colors, fonts, and styles, modify the `CometChatTheme` and `CometChatTypography` properties in your AppDelegate.
***
## Enable Features in CometChat Dashboard
If your app needs any of these features, enable them from your [Dashboard](https://app.cometchat.com):
* Stickers
* Polls
* Collaborative whiteboard
* Collaborative document
* Message translation
* AI User Copilot: Conversation starter, Conversation summary, Smart reply
**How to enable:**
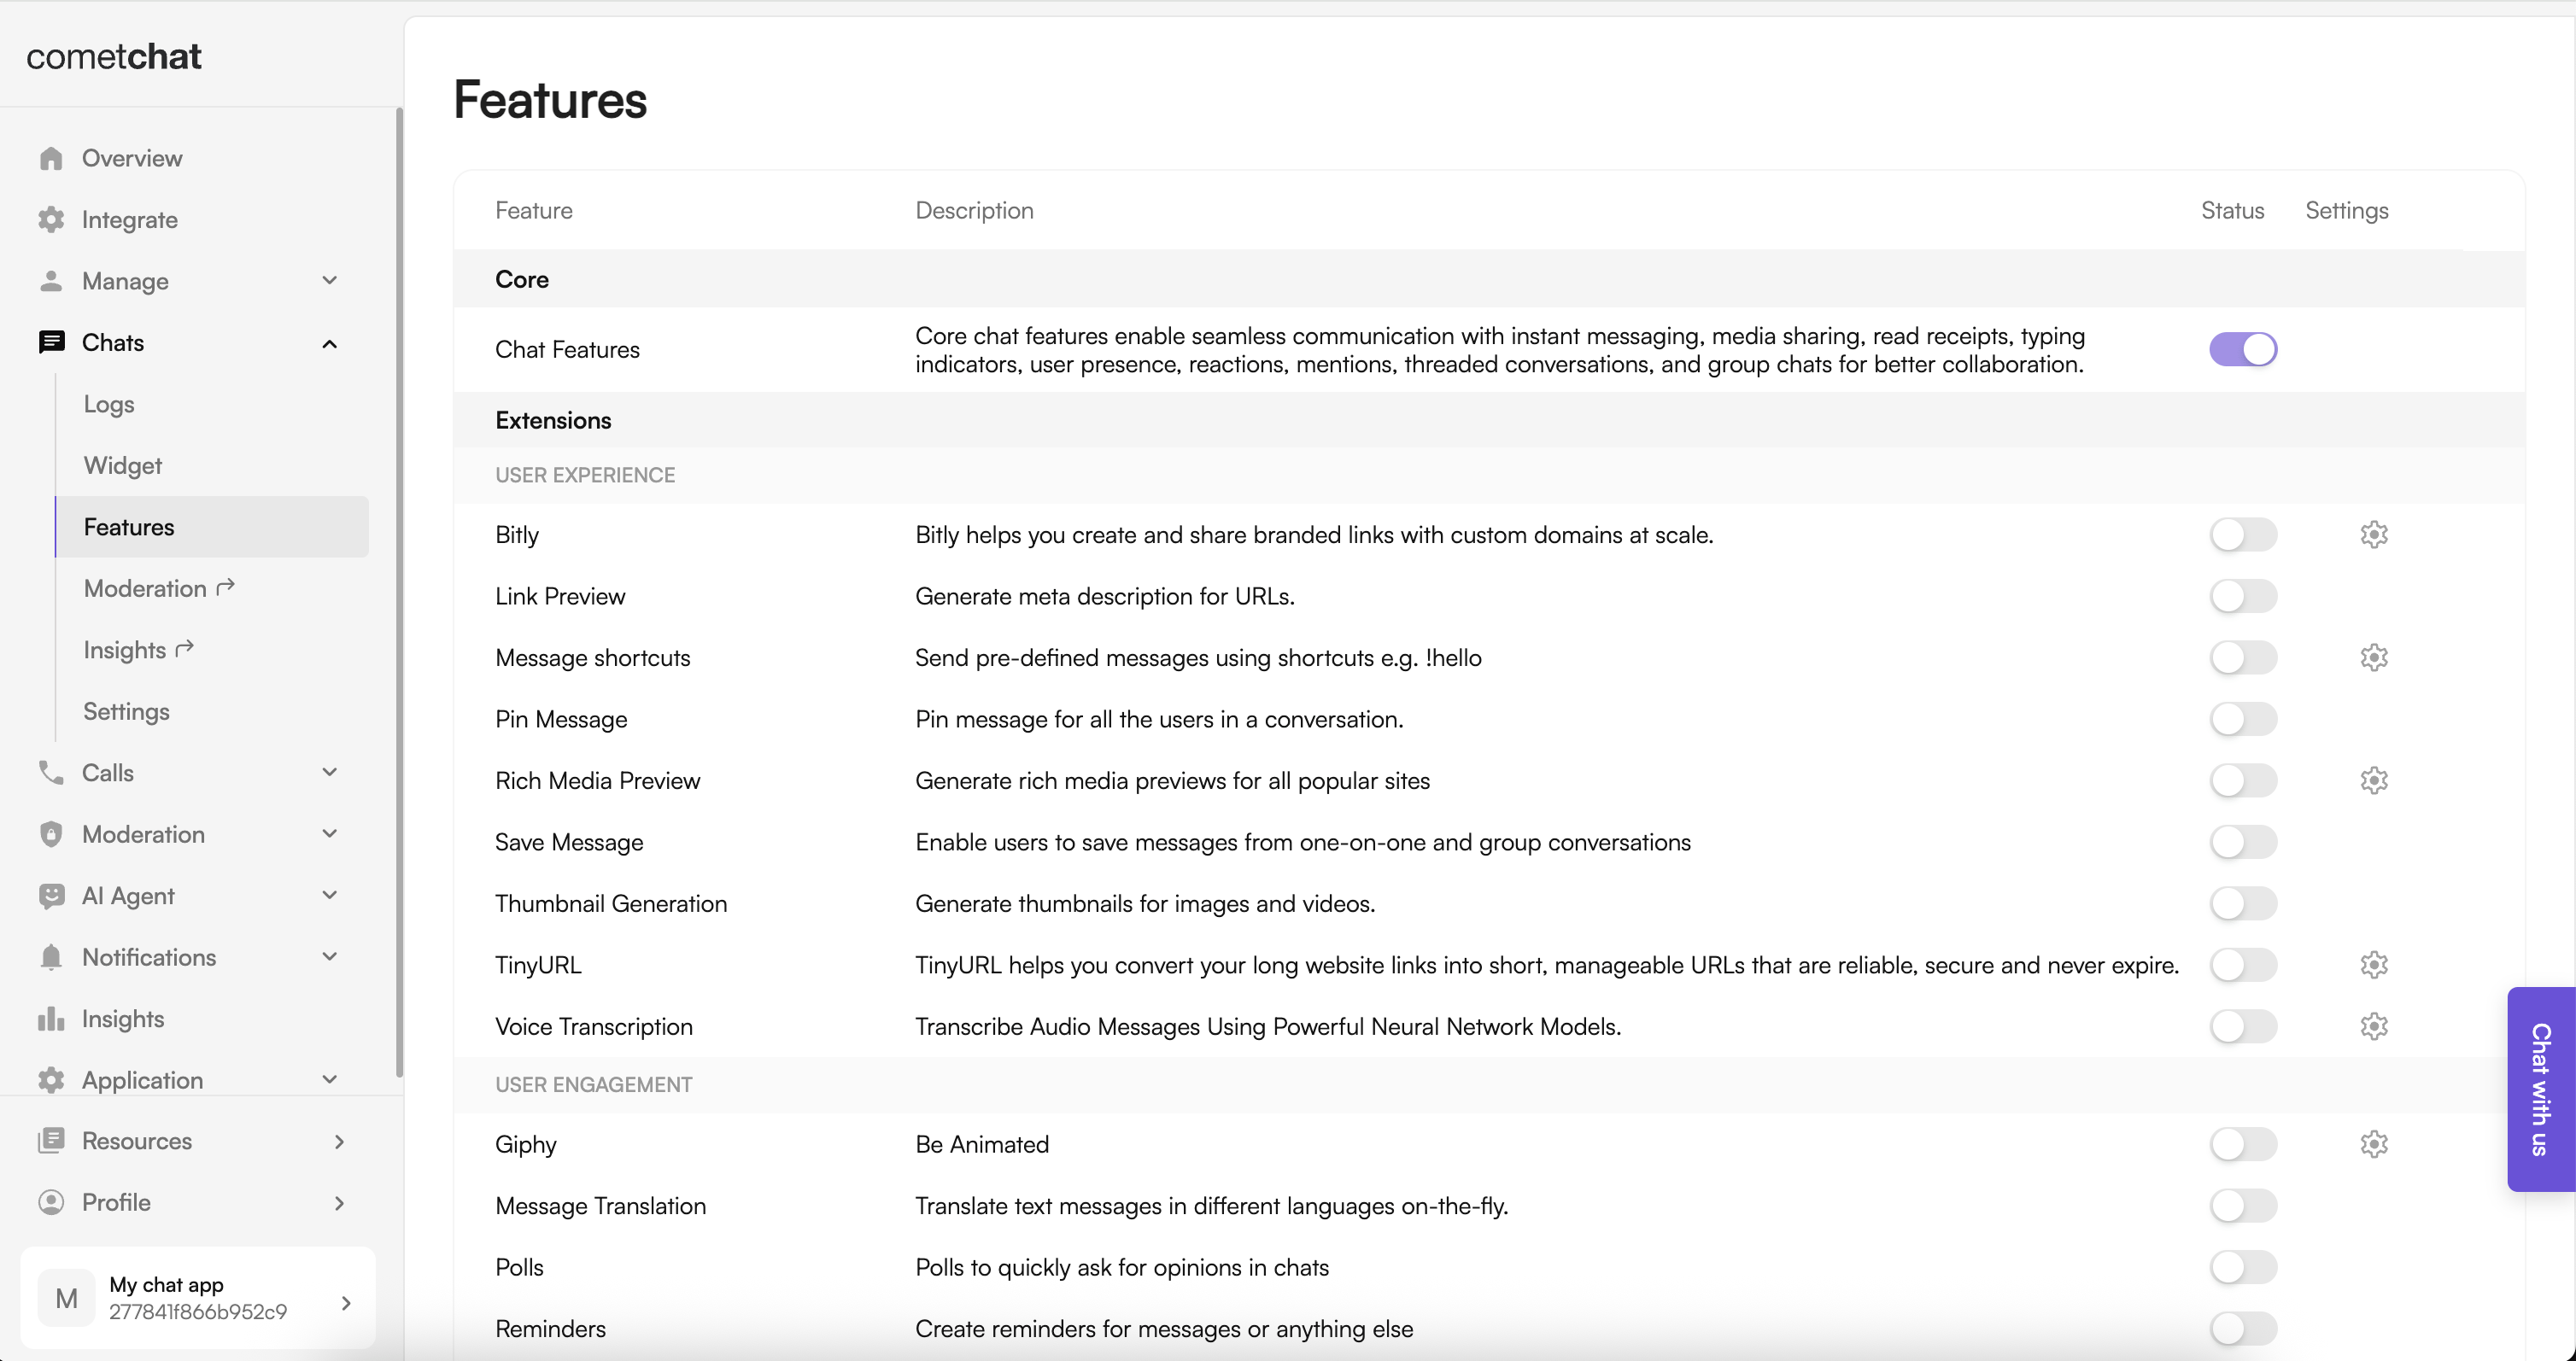 1. Log in to the Dashboard.
2. Select your app.
3. Navigate to **Chat → Features**.
4. Toggle ON the required features and Save.
***
## What You Can Configure
Toggle these features on or off directly in the UI Kit Builder. For a full reference of each setting, see [UI Kit Builder Settings](/chat-builder/ios/builder-settings).
### Chat Features
| Category | Includes |
| ------------------------------- | ------------------------------------------------------------------------------------------------------------------------------------------------------ |
| Core Messaging Experience | Typing indicators, threads, media sharing (photos, video, audio, files), edit & delete messages, read receipts, search, quoted replies, mark as unread |
| Deeper User Engagement | Mentions, @all mentions, reactions, message translation, polls, collaborative whiteboard & document, voice notes, emojis, stickers, user & group info |
| AI User Copilot | Conversation starters, conversation summaries, smart replies |
| User Management | Friends-only mode |
| Group Management | Create groups, add members, join/leave, delete groups, view members |
| Moderation | Content moderation, report messages, kick/ban users, promote/demote members |
| Private Messaging Within Groups | Direct messages between group members |
| In-App Sounds | Incoming & outgoing message sounds |
### Call Features
| Category | Includes |
| --------------------- | ------------------------------------------------------------------------------------ |
| Voice & Video Calling | 1:1 voice calling, 1:1 video calling, group voice conference, group video conference |
### Layout
| Category | Includes |
| -------- | --------------------------------------- |
| Sidebar | With Sidebar or Without Sidebar mode |
| Tabs | Conversations, Call Logs, Users, Groups |
### Theming
| Category | Includes |
| ---------- | ----------------------------------------------------------- |
| Theme | System, Light, or Dark mode |
| Colors | Brand color, primary & secondary text colors (light & dark) |
| Typography | Font family, text sizing (default, compact, comfortable) |
***
## Troubleshooting
### JSON File Not Found
* Ensure your `cometchat-builder-settings.json` is added to the app bundle.
* Confirm the file is included in your app target's Target Membership.
### Network Errors
* Network errors will fallback to user alerts.
* Ensure you have an active internet connection.
### SPM Resource Issues
* For SPM: make sure resources (images) are in `CometChatBuilder.bundle`.
* Confirm package resources are available to your target.
### QR Code Issues
* Ensure your QR code is valid and generated from the official builder.
* Confirm active network connectivity.
***
## Going Beyond Builder Settings
The Builder JSON covers feature toggles, layout, and brand styling. When you need finer control, the exported code is the standard CometChat iOS UI Kit, so you can layer the UI Kit's own customization APIs on top:
| Layer | Use it for | Reference |
| ----------------- | ---------------------------------------------------------------- | -------------------------------------------------- |
| Theme overrides | Global colors, fonts, dark mode beyond the JSON `style` block | [Theme](/ui-kit/ios/theme-introduction) |
| Component styling | Per-component or global style classes (headers, lists, composer) | [Component Styling](/ui-kit/ios/component-styling) |
| Message templates | Custom message bubbles, content/header/reply views | [Message Template](/ui-kit/ios/message-template) |
***
## Next Steps
Understand the settings file and feature toggles.
Adjust component props, behavior, and UI elements.
See how the exported code is organized.
Customize colors, typography, and styling to match your brand.
1. Log in to the Dashboard.
2. Select your app.
3. Navigate to **Chat → Features**.
4. Toggle ON the required features and Save.
***
## What You Can Configure
Toggle these features on or off directly in the UI Kit Builder. For a full reference of each setting, see [UI Kit Builder Settings](/chat-builder/ios/builder-settings).
### Chat Features
| Category | Includes |
| ------------------------------- | ------------------------------------------------------------------------------------------------------------------------------------------------------ |
| Core Messaging Experience | Typing indicators, threads, media sharing (photos, video, audio, files), edit & delete messages, read receipts, search, quoted replies, mark as unread |
| Deeper User Engagement | Mentions, @all mentions, reactions, message translation, polls, collaborative whiteboard & document, voice notes, emojis, stickers, user & group info |
| AI User Copilot | Conversation starters, conversation summaries, smart replies |
| User Management | Friends-only mode |
| Group Management | Create groups, add members, join/leave, delete groups, view members |
| Moderation | Content moderation, report messages, kick/ban users, promote/demote members |
| Private Messaging Within Groups | Direct messages between group members |
| In-App Sounds | Incoming & outgoing message sounds |
### Call Features
| Category | Includes |
| --------------------- | ------------------------------------------------------------------------------------ |
| Voice & Video Calling | 1:1 voice calling, 1:1 video calling, group voice conference, group video conference |
### Layout
| Category | Includes |
| -------- | --------------------------------------- |
| Sidebar | With Sidebar or Without Sidebar mode |
| Tabs | Conversations, Call Logs, Users, Groups |
### Theming
| Category | Includes |
| ---------- | ----------------------------------------------------------- |
| Theme | System, Light, or Dark mode |
| Colors | Brand color, primary & secondary text colors (light & dark) |
| Typography | Font family, text sizing (default, compact, comfortable) |
***
## Troubleshooting
### JSON File Not Found
* Ensure your `cometchat-builder-settings.json` is added to the app bundle.
* Confirm the file is included in your app target's Target Membership.
### Network Errors
* Network errors will fallback to user alerts.
* Ensure you have an active internet connection.
### SPM Resource Issues
* For SPM: make sure resources (images) are in `CometChatBuilder.bundle`.
* Confirm package resources are available to your target.
### QR Code Issues
* Ensure your QR code is valid and generated from the official builder.
* Confirm active network connectivity.
***
## Going Beyond Builder Settings
The Builder JSON covers feature toggles, layout, and brand styling. When you need finer control, the exported code is the standard CometChat iOS UI Kit, so you can layer the UI Kit's own customization APIs on top:
| Layer | Use it for | Reference |
| ----------------- | ---------------------------------------------------------------- | -------------------------------------------------- |
| Theme overrides | Global colors, fonts, dark mode beyond the JSON `style` block | [Theme](/ui-kit/ios/theme-introduction) |
| Component styling | Per-component or global style classes (headers, lists, composer) | [Component Styling](/ui-kit/ios/component-styling) |
| Message templates | Custom message bubbles, content/header/reply views | [Message Template](/ui-kit/ios/message-template) |
***
## Next Steps
Understand the settings file and feature toggles.
Adjust component props, behavior, and UI elements.
See how the exported code is organized.
Customize colors, typography, and styling to match your brand.